Decorating for Christmas doesn’t have to break the bank or add unnecessary waste. By upcycling thrift store finds, you can craft personalized holiday decor and gifts while making eco-conscious choices. This guide shows you how to:
- Spot thrift store items with potential, like glass jars, wooden frames, and vintage tins.
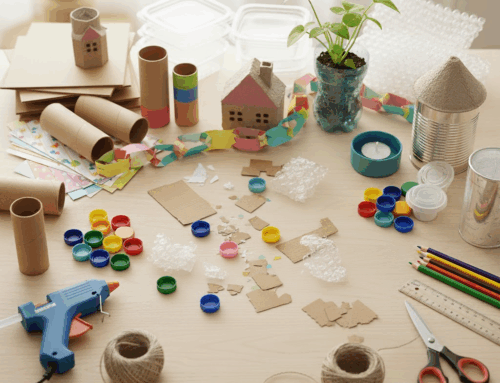
- Use basic tools like a hot glue gun, scissors, and acrylic paint to transform items.
- Create festive projects, like chalkboard signs, snow domes, and wall art from old kitchen tools.
- Support local causes by shopping at places like City Thrift, where purchases help fund community programs.
From budget-friendly ideas to step-by-step safety tips, this article walks you through turning secondhand treasures into standout holiday pieces. Let’s dive into how you can make your decorations truly special while giving back.
How to Choose Thrift Store Items for Christmas Projects
Best Items to Look For
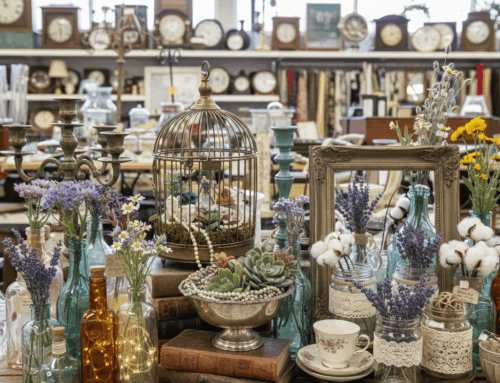
Thrift stores are treasure troves for crafting unique Christmas decorations. Look for glass items like vases, bowls, and jars – they can be turned into snow globes or candle holders that beautifully reflect the glow of holiday lights. Metal containers such as vintage tins, cookie jars, or serving trays are sturdy bases for festive touches like ornaments or LED string lights. Meanwhile, wooden pieces like picture frames, small furniture, and decorative boxes are perfect for painting, staining, or adding embellishments.
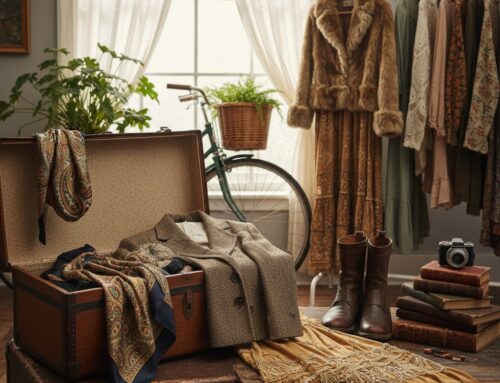
Don’t overlook fabric items like tablecloths, curtains, or old clothing. These can be transformed into tree skirts, holiday pillows, or stockings. Ceramic and pottery pieces – planters, serving dishes, or figurines – often come in charming shapes that can enhance your holiday displays. Even common kitchen items can spark creativity: an old colander could become a quirky light fixture, a vintage mixing bowl might display ornaments, and a serving platter could be refreshed with a festive painted scene. For an extra touch of whimsy, consider old books as a base for unique decor ideas.
Once you’ve gathered your items, take a closer look to ensure they’re ready for upcycling.
How to Check Quality and Potential
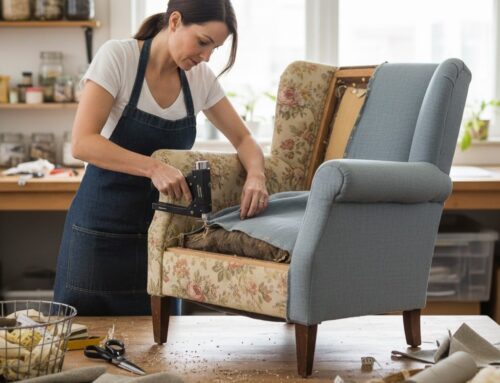
The success of any upcycling project depends on starting with well-made items, even if they look a little worn. Begin by examining the material quality – natural fibers like wool or cotton, along with sturdy materials like wood and metal, are ideal for crafting and cleaning.
Check the structural integrity of each piece. For furniture, ensure the frame is solid and the legs are stable. For fabric items, look for secure stitching and seams that can handle the transformation process. Items with a strong foundation are easier to work with and more likely to result in a polished final product.
Surface imperfections, like scratches or stains, can often be fixed with cleaning or sanding, but be cautious of persistent odors – they can be difficult to remove and might interfere with your project. Finally, think about the item’s potential: Can it be painted, drilled, or modified to fit your Christmas vision? The more flexible the piece, the more creative you can get.
How City Thrift Helps the Community
Shopping at City Thrift isn’t just about finding hidden gems – it’s also an opportunity to give back. Proceeds from your purchases support City Union Mission, which works to combat homelessness and poverty in Kansas City. Every item you buy contributes to these vital programs, making your upcycled holiday decor even more meaningful.
Tools and Materials You Need for Upcycling
Basic Tools You Need
Having the right tools can make crafting a much smoother and enjoyable experience. Start with a hot glue gun – it’s a versatile tool for creating quick, strong bonds on materials like glass, metal, and fabric. Opt for a dual-temperature model, which allows you to work with delicate materials without the risk of melting them.
A pair of sharp scissors is a must for clean cuts on fabric, ribbon, and paper. For precision, keep both fabric scissors and general-purpose craft scissors handy. A craft knife with replaceable blades is great for detailed cuts and scoring materials like cardboard or thin wood.
When painting, a variety of brushes and sandpaper will come in handy. Use coarse sandpaper (120 grit) for rough surfaces and finer sandpaper (220 grit) for smoother finishes.
Measuring tools, such as rulers and measuring tape, help ensure your designs are proportional and aligned. A pencil for marking and painter’s tape for clean, sharp lines are also essential. Don’t forget a drop cloth to keep your workspace protected.
Once you’ve got these basics covered, it’s time to gather materials that will bring your holiday projects to life.
Holiday Decorating Materials
The right materials can transform thrifted items into festive treasures. Acrylic paint in classic holiday shades like deep red, forest green, gold, and silver can completely change the look of any surface. White paint is perfect for creating a snowy effect, especially on wooden or metal items.
For a wintry touch, experiment with artificial snow options like spray, flocking powder, or glitter. Each one creates a unique effect, so try them out to see what complements your project.
Ribbon and fabric are quick ways to add holiday charm. Burlap ribbon gives a rustic, farmhouse vibe, while velvet ribbon adds a touch of elegance. For a cozy, handmade look, use jute twine. Choose ribbon widths based on your specific project.
Holiday embellishments like miniature pinecones, artificial berries, and small ornaments can be easily attached using a hot glue gun. Add a warm glow with battery-operated LED string lights – warm white creates a cozy atmosphere, while multicolored lights bring playful energy.
To add holiday messages, use vinyl lettering or stencils for polished results. Phrases like “Joy“, “Peace“, or “Merry Christmas” work beautifully. Finally, Mod Podge is perfect for sealing painted surfaces or attaching paper elements like vintage Christmas cards or sheet music.
With your tools and materials ready, it’s important to keep safety in mind as you dive into crafting.
How to Craft Safely
Safety should always be a priority while crafting. If you’re using a hot glue gun, keep cold water nearby in case of burns. Work on a heat-resistant surface and unplug the glue gun when you’re done, as it can remain hot for 10-15 minutes after use.
Ventilation is key when working with paints or sprays. Open windows and use a fan to circulate air in your workspace. If possible, work outside or in an open garage when using spray paint or sealers.
Protect your eyes with safety glasses, especially when cutting or sanding materials. If you’re using power tools like drills or sanders, tie back long hair and avoid wearing loose clothing that could get caught.
Keep a first aid kit in your crafting area stocked with bandages, antiseptic wipes, and burn gel. Store sharp tools safely – magnetic strips work well for craft knives, and a container with a secure lid is ideal for loose blades.
When incorporating lights into your decorations, electrical safety is crucial. Ensure battery packs are secure and test all light strings before using them. If you’re drilling holes for lights, double-check that you’re not drilling into electrical wires or other hazards.
Lastly, take breaks if you’re feeling tired or frustrated. Most accidents happen when you’re rushing or not paying attention. Crafting should be a fun and relaxing activity, so pace yourself and enjoy the process of creating beautiful holiday decorations.
Step-by-Step Christmas Upcycling Projects
With your tools and materials ready, dive into these creative projects to transform thrifted treasures into festive holiday decor.
Turn a Chalkboard into a Christmas Sign
A thrifted chalkboard can easily become a charming holiday sign.
Start by giving the chalkboard a thorough cleaning with a damp cloth to remove any old chalk residue. If the frame looks a little worn, sand it lightly with 220-grit sandpaper and repaint it in a festive color like white or gold.
Pick a holiday message, such as “Merry Christmas” or “Joy to the World.” Lightly trace the words onto the chalkboard with a pencil, then apply vinyl lettering for a clean, polished look. For a snowy effect, use a sea sponge to dab white acrylic paint onto the board, creating a textured backdrop. You can also add small painted snowflakes or attach tiny artificial snowflakes using a decoupage medium.
Finish off the design by attaching a festive ribbon bow to the top of the frame with a hot glue gun. Choose a ribbon that fits your theme – burlap for a rustic vibe or velvet for a more elegant touch. This project takes about 2 hours, including time for the paint to dry.
Ready to upcycle some vintage kitchen tools? Let’s move on.
Make Wall Decorations from Kitchen Tools
Vintage kitchen tools from thrift stores can be turned into unique wall decor. Look for items like cookie sheets, wooden cutting boards, and old dishes.
Metal cookie sheets, for instance, can be transformed into rustic wall art using decoupage techniques. As Kim mentions, their natural patina adds a nostalgic charm. Wooden cutting boards are perfect for creating custom holiday signs with paint or stencils, while vintage dishes can simply be hung on the wall as decorative pieces.
Now, let’s create a winter wonderland with glass domes.
Create Snow Scene Domes
Glass cheese domes or cake covers from thrift stores are ideal for crafting magical winter scenes.
Start by cleaning the glass dome and its base. If the base is wooden, consider painting it white or silver to match a wintry theme. Arrange bottle brush trees of different heights inside the dome, securing them with small dots of hot glue. Sprinkle artificial snow or flocking powder around the base to add depth and texture. For an extra touch, weave tiny LED string lights among the trees – the glass dome will beautifully enhance their soft glow.
To complete the scene, add small figurines like deer, snowmen, or miniature houses. Thrift stores often have ceramic pieces that work perfectly for this. For a whimsical effect, mimic falling snow by attaching small white pom-poms or cotton balls to pieces of thread or fishing line, then glue them to the inside top of the dome. The result is a scene that looks like it’s caught in a gentle snowfall.
These snow domes make stunning centerpieces or mantel decorations and can be stored for use year after year. Not only do these projects breathe new life into old items, but they also highlight the joy of sustainable, creative holiday decorating.
How to Display and Gift Your Upcycled Items
Showcasing your upcycled creations thoughtfully can enhance their charm, whether you’re using them as home decor or giving them as gifts.
How to Display Upcycled Decorations
To make your upcycled pieces stand out, group them in odd numbers for a natural visual appeal. For instance, place three snow scene domes at different heights on your mantel or arrange five chalkboard signs of varying sizes along a hallway. This arrangement creates a flow that naturally draws attention.
When it comes to chalkboard Christmas signs, positioning is key. Smaller ones can lean against books on shelves, while larger ones look great on walls using picture hanging strips. On mantels, tuck them behind garlands or evergreen branches so the message peeks through the greenery.
For kitchen tool wall decorations, grouping works best. Mount vintage items like cookie sheets, cutting boards, and plates together on one section of a wall instead of scattering them around. Smaller pieces, such as decorated plates, can rest on picture ledges, making it easy to swap them out with the seasons.
Snow scene domes look magical when placed where they can catch light. Window sills are perfect for daytime displays, while side tables near lamps create a cozy glow in the evening. If you’ve added LED lights inside, position them near outlets so cords stay tidy and out of the way.
Layering textures and heights adds a polished touch. Taller items, like large chalkboards, can sit behind smaller ones, such as snow domes. To create depth and warmth, place vintage scarves or doilies underneath your pieces.
Once your displays are set, turn your attention to wrapping upcycled gifts with creativity and care.
How to Package Upcycled Gifts
For eco-friendly gift wrapping, repurpose thrifted materials. A vintage scarf can double as wrapping – just place the gift in the center, gather the corners, and tie it with a ribbon. The scarf itself becomes part of the gift.
Smaller upcycled items, like ornaments, can be nestled in thrifted wicker baskets, vintage tins, or ceramic bowls. Add a cozy touch by lining the basket with tissue paper or fabric scraps.
Handmade gift tags add a personal touch. Use leftover materials from your projects, like painted cardboard rectangles, and write messages with metallic markers. Attach them with twine or ribbon that complements your wrapping.
Transform brown paper bags into rustic packaging. Fold the top down, punch holes, and thread jute twine through. Add holiday designs using acrylic paint and a sponge for a festive touch.
For a meaningful twist, include before-and-after photos of your upcycled creation. Print these at home and tuck them inside the gift. Showing the transformation from thrift store find to a finished piece adds a personal story that makes the gift even more special.
Once your gifts are wrapped, share the story behind them to make the experience even more memorable.
Sharing Your Community Impact
Your upcycled creations carry a deeper message of sustainability and community support. Tell the story of each piece when gifting it. Share how you rescued the item from a thrift store and gave it new life with your creativity. This adds a personal touch and highlights the environmental benefits of upcycling.
If your materials came from a store like City Thrift, mention the community connection. Explain how your purchase supports City Union Mission’s programs for homelessness and poverty relief. This makes your gift not just thoughtful but also impactful.
Encourage others to join the upcycling movement by suggesting they explore thrift stores for their own projects. Share tips on what to look for and highlight some of your favorite finds to inspire them.
Social media can amplify this message. Post photos of your finished pieces, and include captions about where you found the items and how the purchase supports community causes. Use hashtags like #upcycling and #thriftstorefinds to connect with others who share your passion for sustainable crafting.
For an extra touch, include instruction cards with your gifts. Write simple step-by-step guides for similar projects, along with a list of basic supplies. This not only inspires recipients to try upcycling themselves but also spreads the joy of transforming thrifted treasures.
Pros and Cons of Upcycling Thrift Store Finds
When diving into Christmas crafting, upcycling thrift store finds can be both an exciting opportunity and a bit of a challenge. Let’s explore the upsides and hurdles to help you decide if it’s the right fit for your holiday projects.
Benefits vs. Challenges Comparison
Upcycling thrifted items brings plenty of perks but also requires some careful consideration. Here’s a quick breakdown:
| Benefits | Challenges |
|---|---|
| Cost savings: Thrifted items are budget-friendly compared to brand-new supplies. | Time investment: Projects can take significant time, especially for preparation and drying. |
| Eco-friendly: Keeps items out of landfills and reduces demand for new manufacturing. | Quality concerns: Pre-owned items might have wear or damage that impacts durability. |
| One-of-a-kind creations: Each project has its own unique charm. | Limited inventory: You’re working with what’s available, not necessarily what you envisioned. |
| Community impact: Supports local thrift stores and their initiatives. | Storage challenges: Supplies and unfinished projects can take up valuable space. |
| Skill-building: Encourages creative problem-solving and crafting techniques. | Learning curve: New methods may require practice and research. |
These points highlight the balance between creativity and practicality when upcycling.
Turning a budget-friendly thrift store find into a charming piece of Christmas décor can be incredibly satisfying. With minimal extra materials, you can transform an item into something beautiful – often for a fraction of the cost of similar handmade items sold in stores.
The creative process itself is another big draw. Thrifted pieces often come with surprises – like how different paints or finishes interact with their surfaces. Sometimes, these unexpected results, or “happy accidents“, add even more character to your project.
However, even simple projects, like turning an old chalkboard into a festive Christmas sign, can take several days. Cleaning, priming, and painting all require time and patience. And occasionally, the quality of thrifted items may demand some clever repairs or adjustments to your original vision. The limited selection at thrift stores can also push you to think outside the box when the perfect item isn’t available.
Storage can be another hurdle, especially during the busy holiday season. Managing supplies and unfinished projects takes planning, but with a little organization, it’s manageable.
Despite these challenges, the advantages – like saving money, reducing waste, and creating something truly personal – make upcycling thrift store finds a rewarding way to elevate your holiday decorations and gifts. This balance of benefits and obstacles can help you decide how to approach your next upcycling project.
Conclusion
Turn thrift store finds into festive, personalized Christmas decor and gifts that stand out. In this guide, we’ve looked at how to spot items with upcycling potential, gather the right tools, and follow practical steps to transform everyday objects into holiday masterpieces.
Each project offers more than just a creative outlet – it blends personal expression with a commitment to sustainability. Whether it’s turning an old chalkboard into a cheerful Christmas sign, repurposing kitchen utensils into rustic wall art, or crafting whimsical snow scene domes, these creations tell a story that store-bought decorations simply can’t replicate.
Shopping at City Thrift adds another layer of meaning to your efforts. Every purchase supports City Union Mission’s work in addressing homelessness and poverty in the Kansas City area. Your holiday crafting becomes part of a larger mission to uplift the community, making your decorations even more impactful.
Sure, challenges like time, quality, or storage might come up, but with a bit of planning, they’re easy to manage. The payoff? Saving money, reducing waste, and creating one-of-a-kind pieces that bring joy to your home and beyond.
Your upcycled decor doesn’t just brighten your space – it supports local initiatives, delights gift recipients, and sparks meaningful conversations about sustainable living. Each piece is a testament to how creativity can transform not just your home, but your community as well.
This holiday season, let overlooked treasures shine. Your efforts will benefit your wallet, your neighbors, and the planet.
FAQs
What are some fun and budget-friendly ways to upcycle thrift store finds for Christmas decorations?
Looking to add some festive flair to your home without breaking the bank? Thrift store treasures can be the perfect starting point for unique holiday makeovers! For instance, vintage glassware or candle holders can be repurposed into elegant centerpieces or ornaments. A dash of paint or a sprinkle of glitter can breathe new life into old picture frames, vases, or bowls, turning them into stunning seasonal decorations.
Want to add a cozy, handmade touch? Thrifted sweaters or linens are great for crafting stockings, tree skirts, or decorative pillows that bring a warm and inviting holiday feel.
You can even get creative with gift wrapping by transforming thrifted items like baskets, jars, or gift bags into charming, one-of-a-kind packaging. Not only are these DIY ideas budget-friendly, but they also add a personal and heartfelt touch to your celebrations. With a little imagination, those secondhand finds can make your Christmas decor stand out in the best way!
What should I look for when choosing thrift store items to upcycle for Christmas projects?
When picking out thrift store finds for upcycling projects, it’s important to focus on items that are in decent shape. Aim for pieces without stains, rips, or strong odors, as these issues can be tough to fix and might impact your final product. Opt for well-made materials, with sturdy construction and durable fabrics or finishes that can withstand crafting and decorating. Also, steer clear of anything with visible damage or wear that could affect its safety or longevity.
Thrift stores like City Thrift are treasure troves for second-hand finds, offering plenty of options to transform into one-of-a-kind Christmas decorations or gifts. With a bit of imagination, you can give everyday items a festive and personal touch!
How does shopping at City Thrift benefit the community and the environment?
Shopping at City Thrift isn’t just about finding great deals – it’s about making a difference. When you buy second-hand items, you’re helping to reduce landfill waste and encouraging more eco-friendly habits. Plus, choosing thrifted goods means less demand for manufacturing processes that use up valuable resources, which is a small but meaningful step toward a greener future.
But the impact doesn’t stop there. Every purchase you make supports local initiatives like job training programs, housing assistance, and other essential services for people in need. City Thrift plays a key role in strengthening the community, all while promoting a spirit of generosity and environmental awareness.