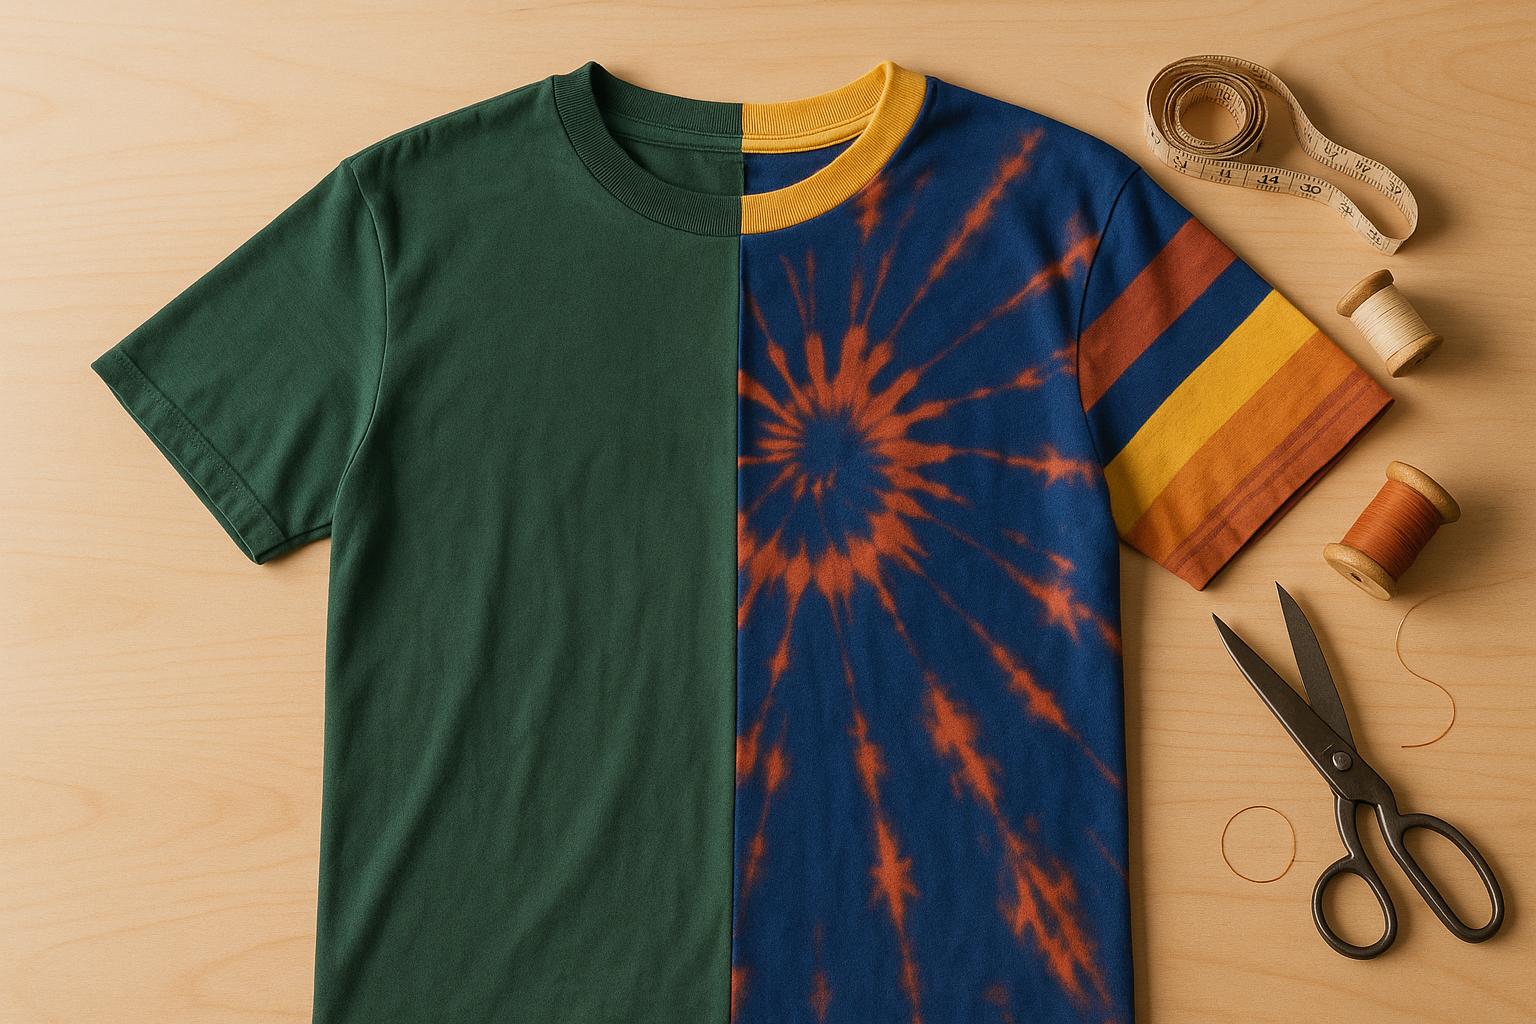
Split t-shirts are made by sewing halves of two different t-shirts together, creating a bold, personalized design. This DIY project is simple: cut two thrifted tees in half, align them, and sew them back together. It’s a fun way to reuse old clothes, reduce waste, and support thrift stores like City Thrift, which also contributes to community programs in Kansas City.
What You’ll Need:
- Two thrifted t-shirts (similar fabric and size work best)
- Fabric scissors
- Pins or clips
- Sewing machine or needle and thread
- Measuring tape and iron
Steps:
- Cut each t-shirt in half along the center.
- Align the halves, ensuring seams match.
- Sew the pieces together, leaving a ½-inch seam allowance.
- Press seams and finish edges for durability.
Tips:
- Choose tees with complementary colors or designs.
- Wash, dry, and press the shirts before starting.
- Experiment with optional tools like fabric paint or patches for extra flair.
This project not only adds a custom piece to your wardrobe but also promotes eco-friendly fashion and supports local communities.
Materials and Tools Needed
Making a split t-shirt is a straightforward project that doesn’t require a lot of supplies. You can start with basic items and gradually add more specialized tools as you gain experience.
Basic Supplies
- Two thrifted t-shirts: These will be the main materials for your project. Look for stretchy, comfortable t-shirts – thrift stores like City Thrift are great places to find affordable options that are easy to work with.
- Sharp fabric scissors: These are a must for clean, precise cuts. Dull scissors can leave rough edges, making sewing harder and the final product less polished. Test your scissors on paper first to ensure they’re sharp enough.
- Straight pins or fabric clips: These help hold your fabric in place while you sew. Clips are especially useful for stretchy fabrics since they won’t leave holes like pins do. You’ll need about 10-15 for a typical project.
- Sewing machine or needle and thread: A sewing machine makes the process faster, but hand-sewing works fine for beginners. If using a machine, opt for a ballpoint needle designed for knits to avoid damaging the fabric.
- Measuring tape: A 60-inch tape measure will help you make accurate cuts and ensure the finished t-shirt fits well.
- Iron: Pressing your seams with an iron gives your shirt a polished, professional look.
With these basic tools, you’ll be ready to create your first split t-shirt. Once you’re comfortable with the process, you can experiment with additional tools to personalize your designs.
Optional Tools for Customization
If you want to take your split t-shirt to the next level, consider these optional tools and supplies:
- Fabric paint and stencils: Add custom designs or accents to your shirt. You can use these to unify the two fabrics with decorative touches along the seams.
- Patches and embroidery supplies: Vintage patches or embroidered designs can add texture and a unique flair. For example, a band patch or a travel-inspired design can help blend the two shirt styles seamlessly.
- Rotary cutter and cutting mat: These tools make cutting faster and more precise, especially if you plan to make several t-shirts. They also reduce hand strain during long crafting sessions.
- Fabric glue: Perfect for no-sew projects. While not as durable as sewing, fabric glue is a quick solution for temporary designs or for combining with light hand-stitching.
- Decorative trims, buttons, and beads: Small details like buttons along the seam or a trim at the hem can transform a simple split t-shirt into a standout piece.
With these optional tools, you can get creative and turn each split t-shirt into a personalized fashion statement.
Selecting and Preparing Thrifted Tees
When it comes to creating a split t-shirt, the foundation of your project lies in selecting the right thrifted tees and prepping them properly. The effort you put into choosing and cleaning your shirts will directly impact the final look and feel of your design. It’s all about finding tees that complement each other in fabric, size, and style.
How to Choose Compatible T-Shirts
Start by focusing on fabric compatibility – this is the most important factor. Cotton t-shirts are a great choice, especially for beginners, because they’re soft, easy to sew, and comfortable to wear. Cotton/polyester blends are another solid option, offering the softness of cotton with the added durability and wrinkle resistance of polyester. If you’re shopping at a place like City Thrift, take the time to feel the fabric textures and compare weights. Shirts with similar fabric weights will drape more evenly when combined.
Next, consider size compatibility. Ideally, the shirts should be close in size, or you can opt for one that’s slightly larger than your usual fit. This gives you some flexibility when cutting and assembling, helping you avoid awkward proportions. Pairing a medium with a large can work if done thoughtfully, but try to steer clear of extreme mismatches, like combining a small with an extra-large.
Color and design coordination is where your creativity can shine. Complementary colors often produce the most visually pleasing results. For example, pair a solid navy tee with a white shirt that has navy graphics, or combine two vintage band tees for a cohesive retro vibe. If you’re feeling bold, contrasting colors like black and white or red and blue can make a striking statement. Just be mindful of graphic designs – avoid pairing two busy prints that might clash. A minimalist logo, for instance, pairs better with a simpler design than with something overly colorful or detailed.
Lastly, don’t forget to check the neckline and sleeve styles. Crew necks should be paired with other crew necks, and V-necks with V-necks, to ensure seams align properly. Mixing different neckline styles can lead to uneven and challenging construction.
Preparing the T-Shirts
Once you’ve chosen your t-shirts, the next step is to prepare them carefully. This involves inspecting, cleaning, and pressing to ensure your final product is polished and professional.
Start by examining each shirt for any damage, like holes, stains, or worn-out areas, and check pockets for forgotten items. Pay close attention to thin spots or tears that could interfere with your cutting or sewing.
If you spot any stains, pre-treat them before washing. Apply a stain remover to the affected areas and let it sit for the recommended time. This step is crucial to prevent stains from setting during the wash, ensuring your finished project looks clean and well-made.
Sort your shirts by color and fabric type, and always follow the care labels. For cotton t-shirts, wash them in cold water and consider adding a bit of white vinegar to neutralize any lingering odors.
Drying thrifted shirts requires extra care. If you’re unsure how a fabric will react to heat, play it safe and hang dry the shirt instead of using a dryer. This prevents unwanted shrinkage that could throw off your sizing. Cotton shirts generally handle medium heat in the dryer well, but delicate fabrics or shirts with graphics should be air-dried to avoid damage.
Finally, press your t-shirts with an iron to remove wrinkles and create smooth surfaces for cutting and measuring. Use the correct heat setting for the fabric – cotton can take higher heat, while polyester blends need a lower temperature to avoid melting or shiny marks.
Once your shirts are clean, dry, and pressed, lay them flat and do a final check. Place them side by side to confirm that your color choices still look good together and that the sizes will give you the proportions you’re aiming for in your split t-shirt design.
Step-by-Step Guide to Creating a Split T-Shirt
Turn your thrifted tees into a stylish split t-shirt with a little cutting, aligning, and sewing. Here’s how to do it step by step.
Cutting and Aligning the T-Shirts
The secret to a great split t-shirt is precise cutting and alignment. Start by laying one t-shirt flat and folding it neatly in half lengthwise, ensuring the seams from the neckline to the hemline are perfectly aligned.
Use fabric scissors or a rotary cutter to cut along the center fold. Leave a ½-inch seam allowance from the fold line – this extra fabric is essential for creating a strong seam that holds up over time. Repeat the process with your second t-shirt, but this time, cut the opposite half of the shirt. For instance, if you’re using the left half of the first shirt, keep the right half of the second shirt. This creates the iconic split design, where each half of the new shirt comes from a different tee.
Once both halves are ready, lay them side by side. Check that the shoulders and armholes align. If one half is slightly longer, mark where it needs to be trimmed so both pieces match. With everything aligned, you’re ready to sew.
Sewing the T-Shirts Together
Pin the two halves together with the right sides facing each other. This ensures the seams will be on the inside when you’re done.
For knit fabrics, use a 12/80 universal needle and all-polyester thread. Set your sewing machine to a straight stitch with a 2.5-mm stitch length, which works well for light to medium-weight knits. If you want added stretch, a baby zigzag stitch is a good alternative.
Knit fabrics can be tricky – they tend to stretch while sewing. To avoid this, apply light pressure on the presser foot as you stitch. Sew 1 to 2 inches at a time, then release the pressure before continuing. Start sewing from the bottom hem and work your way up to the neckline, keeping a ½-inch seam allowance. Take extra care around curved areas like the armholes. Once sewn, you’re ready to refine the details.
Finishing Touches
Press the seam using the appropriate heat setting for your fabric – higher heat for cotton, lower for polyester blends. Instead of pressing the seam allowances flat, press them to one side. This adds strength to the seam.
To handle raw edges, you have a few options. A simple raw edge works well for a casual, handmade vibe. For a cleaner look, use pinking shears or a serger, if you have one. For added durability, especially along the shoulders, consider a mock flat-felled seam. This involves folding the seam allowance over itself and stitching it down, giving a smooth, professional finish.
Check the neckline and armholes to ensure they sit properly. If you notice any stretching, you can stabilize the garment by sewing a narrow strip of clear elastic along the shoulder seam.
Finally, give your new split t-shirt a final press, focusing on the center seam. Try it on to check the fit and make any small adjustments. The beauty of using thrifted tees from places like City Thrift is that you can experiment freely without worrying about costly mistakes. Each project is a chance to improve your skills and explore new creative ideas.
Styling and Caring for Your Split T-Shirt
A split t-shirt is not just a piece of clothing – it’s a statement. With its bold design, it offers plenty of styling possibilities, but it also requires proper care to maintain its distinctive appearance.
Styling Ideas for Split T-Shirts
For everyday casual looks, pair your split t-shirt with jeans or chinos. The contrasting halves of the shirt naturally draw attention, making it a perfect match for classic denim. Add white sneakers or casual loafers to keep things simple yet stylish. Accessories should be minimal – think a leather watch or a casual belt – to complement, not compete with, the shirt’s unique design.
For smart-casual settings, you can elevate your split tee by mixing it with more polished pieces. Try layering a tailored blazer over the shirt and pairing it with chinos or dress trousers. This combo works well for creative office spaces, casual Fridays, or weekend get-togethers. Finish the look with dress shoes like Oxfords or leather loafers to strike a balance between relaxed and refined.
“The suit-with-tee look works because it redefines elegance. A well-fitted t-shirt tones down the formality of a traditional suit, offering a more approachable, modern aesthetic, without losing its polished edge.” – Hockerty
For a fashion-forward take, pair your split t-shirt with a lightweight suit jacket. If the shirt fits well and has a crew neckline, tuck it into tailored trousers with a leather belt for a sharp, structured look. Alternatively, leave it untucked for a more laid-back vibe, ensuring the hem sits neatly at your beltline. Neutral color combinations work best here: for example, a navy-and-white split tee pairs beautifully with gray trousers, while a monochromatic ensemble with charcoal pieces offers a sleek finish.
Layering is another way to add depth to your outfit. A split t-shirt works well under a cardigan on cooler days or as a base layer beneath a lightweight jacket. The split design subtly peeks through, adding an unexpected detail to your look.
Once you’ve nailed your style, it’s important to care for your split t-shirt properly to keep it looking fresh.
Care Instructions
To maintain the design and fabric quality of your split t-shirt, wash it inside out in cold water on a gentle cycle. Use a mild detergent and avoid bleach or fabric softeners, which can weaken the fibers. If you’re worried about colors bleeding between the two halves, toss in a color catcher sheet during the wash.
Air drying is the best option for split t-shirts. Tumble drying can cause uneven shrinking and distort the center seam. Hang the shirt in a shaded area, away from direct sunlight, to prevent fading. If ironing is necessary, always iron the shirt inside out or use a pressing cloth to protect the fabric. Pay special attention to the center seam – press it flat to keep the design looking sharp and professional.
The Impact of Upcycled Fashion
Beyond being stylish, your split t-shirt is part of a bigger movement: sustainable fashion. By sourcing materials from places like City Thrift, you’re not only repurposing textiles but also supporting community initiatives. City Thrift works with City Union Mission to provide assistance for homelessness and poverty relief in Kansas City.
Upcycled fashion gives you full creative control over your wardrobe. Unlike mass-produced clothing, each split t-shirt is a one-of-a-kind piece, showcasing your style and creativity. The process of selecting fabrics and sewing them together hones skills that can be applied to future projects, encouraging thoughtful reuse in everyday life.
Your upcycled tee isn’t just a fashion statement – it’s a conversation starter. It highlights the value of thrift shopping and upcycling while supporting organizations like City Thrift. Every piece you create contributes to a more sustainable future and strengthens community programs, proving that fashion can be both stylish and meaningful.
Conclusion
Turn two thrifted tees into a stylish and eco-friendly statement piece. By carefully selecting, cutting, aligning, and sewing compatible shirts, you breathe new life into pre-loved garments. This simple upcycling project not only gives you a one-of-a-kind addition to your wardrobe but also helps combat textile waste and supports the idea of a circular economy. Plus, it’s a great way to sharpen your sewing skills while embracing sustainable fashion.
Beyond giving old clothes a second chance, your efforts can also benefit your local community. Shopping at places like City Thrift provides affordable, quality materials and helps support initiatives addressing homelessness and poverty in Kansas City. With their wide range of second-hand clothing, you’ll find endless possibilities – whether you’re combining vintage band tees, bold solids, or eye-catching patterns.
With basic sewing skills and access to thrifted treasures, the door to upcycled fashion is wide open. Every project you take on contributes to a greener planet and a stronger community. Head over to City Thrift for your next creative spark and become part of the movement toward sustainable fashion.
FAQs
How do I pick two thrifted t-shirts that work well together for a split t-shirt design?
When picking thrifted t-shirts for a split design, focus on finding similar fabric types – this makes sewing them together smoother and ensures the finished piece feels comfortable to wear. To create a unified look, go for shirts with colors, patterns, or themes that work well together. If you’re aiming for something bold and striking, mix contrasting colors or pair graphic designs. Also, consider the fabric’s weight and texture to keep the final piece balanced and well-finished.
What should I watch out for when sewing two t-shirt halves together?
When sewing two halves of a t-shirt together, there are a few pitfalls to watch out for if you want your split t-shirt to look polished and hold up over time. First, double-check that the fabric edges are properly aligned before you start sewing. Misaligned edges can lead to uneven seams, which might throw off the whole look. Second, opt for a stretch stitch or a zigzag stitch instead of a straight stitch. Straight stitches are prone to snapping when the fabric stretches, which is a common issue with t-shirt material. Lastly, don’t rush through the cutting process. Uneven cuts make it much harder to match the two halves neatly, so take your time here.
By focusing on these steps, you’ll end up with a stylish and long-lasting split t-shirt. And if you’re grabbing your tees from a thrift store like City Thrift, you’ll have access to plenty of unique patterns and colors to create something that’s truly one of a kind!
How do I keep my split t-shirt looking great after several washes?
To keep your split t-shirt looking its best, start by turning it inside out before tossing it in the wash. Stick with a gentle detergent to avoid harsh chemicals that could weaken the fabric. Make sure not to overload the washing machine – overcrowding can lead to unnecessary wear and tear.
When it comes to drying, air drying is the safest option to preserve the shirt’s shape and prevent shrinking. If you’re short on time, use the dryer on a low heat setting. For an extra touch, add a small splash of vinegar to the wash – it can help keep the fabric soft and the colors bright.