Looking to refresh your walls without spending a fortune? Here’s the gist: Thrift stores are goldmines for affordable materials like picture frames, plates, textiles, and baskets. With a little effort, you can transform these finds into personalized wall art that’s budget-friendly and reduces waste. From framed book pages to painted plates and fabric art, these projects are easy for beginners and require only basic supplies like paint, glue, and scissors. Bonus: Shopping at places like City Thrift in Kansas City not only saves money but also supports local community initiatives. Let’s dive into 10 creative ways to turn secondhand treasures into stunning wall decor.
Why Make DIY Wall Art from Thrift Store Items
Creating your own wall art from thrift store finds isn’t just budget-friendly – it’s an opportunity to turn overlooked items into something beautiful and personal. Instead of spending more on store-bought pieces, you can save money while giving new life to discarded treasures.
Unlike mass-produced art that often feels generic, thrifted items come with their own story and charm. These unique finds can add character to your home, making your space feel more personal and distinctive.
Another big perk? DIY wall art gives you complete creative control. You can choose the colors, size, and style to perfectly match your décor. It’s a chance to blend your creativity with a meaningful touch, especially when you’re working with local thrift finds.
For those in Kansas City, shopping at City Thrift adds an extra layer of purpose. Not only can you discover hidden gems, but your purchases also support City Union Mission’s efforts to combat homelessness and poverty.
On top of saving money and reducing waste, these projects help you develop hands-on skills like painting, crafting, and design. Plus, completing a DIY project can be a real confidence booster.
And here’s the best part: DIY wall art doesn’t have to take a lot of time. Even if your schedule is packed, it’s a quick and rewarding way to refresh your space.
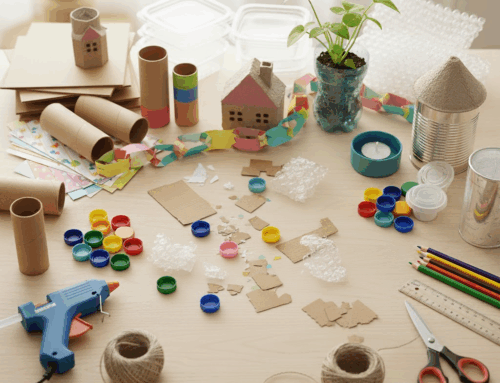
Supplies and Preparation
Starting your DIY wall art journey is all about finding the right treasures. The magic of these projects lies in their simplicity – most of what you need is likely waiting for you on the shelves of City Thrift, ready to be transformed into something special.
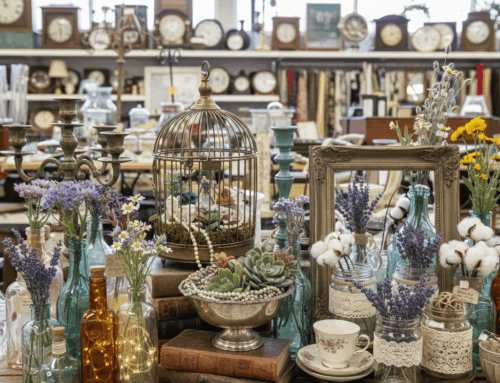
Thrift Store Finds Worth Hunting For
- Picture Frames: These are perfect for a variety of wall art projects. Look for frames in different sizes, ranging from small 4×6-inch ones to larger 16×20-inch options. Don’t worry if the glass or backing is damaged – you can always replace or remove those parts. Wooden frames are especially great, as they take paint well and are easy to customize.
- Plates and Serving Dishes: These can create beautiful wall displays when arranged thoughtfully. Look for vintage patterns, bold designs, or simple solid colors that match your decor. While ceramic and porcelain pieces work well, avoid items with chips or cracks that might worsen over time.
- Fabric and Textiles: Old scarves, fabric remnants, or vintage textiles can be turned into eye-catching art. Look for bold patterns, interesting textures, or even neutral tones that complement your space. Even worn clothing with unique prints can be repurposed into framed textile art.
- Baskets: Woven baskets in various shapes and sizes add texture and dimension to walls. Look for intricate patterns or natural materials that bring warmth to your decor. Small- to medium-sized baskets are ideal for wall mounting.
Gathering Your Crafting Tools and Materials
To bring your ideas to life, you’ll need a basic toolkit that includes:
- Acrylic paints, assorted brushes, foam brushes, and craft glue
- A hot glue gun with sticks and adhesive strips
- Sharp scissors, craft knives, and cutting mats for precise cuts
- Sandpaper (fine and medium grits) for prepping surfaces
- Primer to ensure your paint adheres properly
Having these essentials on hand will make your crafting process smooth and enjoyable.
How to Choose Quality Items at City Thrift
Durability is key when selecting items for your projects. When browsing, check frames for sturdy joints and minimal warping. For items like mirrors or decorative boxes, ensure hinges and other moving parts are in good condition. For fabric pieces, inspect for stains, tears, or heavy wear. While minor imperfections can add character, significant damage might complicate your project.
Cleaning and Preparing Your Finds
Before diving into crafting, proper cleaning is a must. Here’s how to clean your thrifted treasures:
- For Fabrics: Sort by type, then freeze overnight or sun-dry for 24 hours. Follow this with a cold wash using detergent and a rinse-cycle sanitizer to eliminate odors and germs.
- For Hard Surfaces: Mix a cleaning solution using hot water, dish soap, white vinegar, and rubbing alcohol. This mix effectively sanitizes and removes grime. Use it to wipe down frames, plates, baskets, and other items, paying special attention to crevices where dirt may hide.
Getting Surfaces Ready for Painting
Once everything is clean and dry, a little prep work goes a long way for a polished finish. Lightly sand glossy surfaces with fine-grit sandpaper to help paint adhere better. Wipe away any dust with a tack cloth, then apply a bonding primer – especially important for dark or glossy finishes. Let the primer dry completely before painting. These steps ensure a smooth and long-lasting result.
Setting Up Your Workspace
Create a comfortable and organized space for your projects. Choose a well-ventilated area with plenty of natural light. Keep a container of water nearby for cleaning brushes and have paper towels ready for quick cleanups. Arrange your supplies so that frequently used tools are within easy reach. A tidy and functional workspace will keep your creativity flowing without interruptions.
1. Book Page Canvas Art
Give old books a new purpose by turning them into stylish wall art! With a little creativity, you can transform thrifted books from City Thrift into unique decor pieces that add a touch of literary flair to any space. It’s a fun and budget-friendly way to upcycle while showcasing your personal style.
What to Look for at City Thrift: Start by browsing for hardcover or paperback books. The condition doesn’t matter since you’ll be using the pages, not the covers. Keep an eye out for books with eye-catching typography or vintage fonts that match your aesthetic. Poetry collections, classic literature, and even old textbooks can work beautifully. You’ll also need a blank canvas – sizes between 8×10 inches and 16×20 inches are ideal.
Supplies You’ll Need: Besides your thrifted books, grab some Mod Podge (your go-to adhesive), a foam brush for smooth application, scissors for trimming, and optional extras like scrapbook paper or stencils for added flair.
How to Create Your Art: Begin by selecting pages with interesting text or layouts. Carefully cut them to highlight the sections you love, then experiment with layering and arranging the pieces on your canvas. Aim for a balanced design that feels cohesive.
Inspiration alert: Back in September 2012, My Blessed Life™ shared a “DIY Book Page Canvas” project that produced stunning wall art for under $5 using thrift store materials and basic craft supplies.
Putting It All Together: Once your layout is ready, use the foam brush to apply Mod Podge to the canvas in small sections. Press each book page onto the adhesive, smoothing out air bubbles as you go. Trim any excess paper around the edges for a clean, polished look.
Make It Your Own: Want to add a pop of color? Paint the canvas background or use colored pencils and oil-based paint pens to emphasize specific words or sections of text.
Helpful Tips: Allow each layer of Mod Podge to dry completely before sealing your masterpiece with a protective top coat.
This project is perfect for cozy reading corners, home offices, or any room that could use a little literary charm!
2. Painted Plate Wall Display
This project takes the idea of turning everyday items into personalized art to a whole new level. With just a few coats of paint, you can transform thrift store plates into stunning wall decor. It’s a simple project that’s perfect for beginners and can easily become the centerpiece of any room. The best part? You can tailor the colors and patterns to match your home decor perfectly.
What to Look for at City Thrift: Keep an eye out for ceramic platters, plates, and bowls, as well as vintage silver-plated items. These make excellent canvases for painting. Stick to materials like ceramic, porcelain, or metal for the best results, as melamine and plastic surfaces don’t hold paint well.
Canary Street Crafts shared how they transformed thrift store finds – including silver plates and plastic platters – into a cohesive wall display using Annie Sloan chalk paint and dark wax.
What You’ll Need:
- Pebeo Porcelaine 150 paint in your chosen colors
- Small brushes for detail work
- Masking tape for clean lines
- A palette for mixing colors
- A bowl of water for cleaning brushes
How to Get Started: Begin by thoroughly cleaning your plates and letting them dry completely. Decide on your design – geometric shapes, ombré effects, or even simple color blocking can all work beautifully. Use masking tape to create clean, sharp lines, and apply thin, even coats of paint for the best coverage.
Once your design is complete, cure the plates in your oven following the paint manufacturer’s instructions. This step ensures the finish is durable and long-lasting. After curing, your painted plates are ready to hang.
Hanging Options: Once your pieces are ready, you’ll need a way to display them. Wire plate hangers are a budget-friendly option – you can often find them at yard sales for as little as $1, compared to $3–$5 at retail stores.
For a no-damage approach, adhesive plate hangers are a great alternative. In 2025, Cindy Rust from Reinvented Delaware demonstrated how adhesive hangers from The Flatirons Disc Company in Boulder, Colorado, securely held vintage plates and trays on her wall. These discs activate with water – just wet them, stick them to the back of your plate, and let them dry overnight.
Pro Tips for Layout: Before committing to any holes in your wall, create paper templates of your plates and tape them up with painter’s tape. This lets you experiment with the arrangement until it feels just right. Leave at least 3 inches of space between each item for a balanced look. Start with the largest piece at eye level and build around it for a cohesive design.
The result? A completely custom wall display that’s not only affordable but also a reflection of your creativity and style.
3. Textile or Fabric Frame Art
Transforming textiles into wall art is a creative way to add personality to your space while cutting down on waste. Fabric frame art takes thrifted fabrics and turns them into eye-catching decor pieces. It’s an easy, sustainable DIY project that blends style with purpose.
Where to Start at City Thrift: Head to the linens section to find tablecloths, curtains, or bed sheets that can provide plenty of fabric. Keep an eye out for items with interesting textures, bold prints, or intricate embroidery – these elements can become the centerpiece of your art.
Thrift stores are a treasure trove for affordable materials. Curtains might be priced around $5, fabric yardage at $1–3 per yard, bolts for about $10, and bags of fabric scraps for as little as $2. Occasionally, you might stumble upon a partial bolt of high-quality fabric for a fraction of its retail cost.
Check Before You Buy: Inspect fabrics carefully for any stains, odors, fraying, or discoloration. Opt for natural materials like 100% cotton or linen, which are easier to work with and hold up better over time.
What You’ll Need:
- Picture frames in assorted sizes (thrift stores often have these, too)
- Fabric scissors
- Iron and ironing board
- Spray bottle for misting fabric
- Double-sided tape or fabric glue
- Cardboard backing (if your frames don’t include one)
Once you’ve gathered your materials, it’s time to prep the fabric.
How to Create Your Textile Art: Start by washing any thrifted fabric to remove odors and ensure it’s clean. After washing, let it dry completely, then iron it to eliminate wrinkles. Cut your fabric pieces about 2 inches larger than the frame opening to allow for easy wrapping.
Choose fabrics that work well with your room’s color scheme for a cohesive look.
Assembly Tips: Remove the glass from your frames to prevent moisture from getting trapped behind the fabric. Stretch the fabric tightly over the cardboard backing, securing it with double-sided tape or fabric glue on the back. Be mindful of the corners – fold them neatly for a polished appearance.
How to Display: Mix and match frames of different sizes and textures for a dynamic wall arrangement. Pair vintage lace with bold geometric patterns or soft florals for added depth and visual interest.
This project shows that secondhand doesn’t mean settling. Your finished textile art will carry its own story and charm, offering a personal touch that brand-new materials simply can’t replicate – all while embracing sustainable decorating.
4. Yarn or Fiber Wall Hanging
Turn thrifted yarn, rope, and fabric scraps into stunning bohemian wall hangings that bring texture and warmth to your space.
Finding Materials at City Thrift: Thrift stores like City Thrift are treasure troves for DIY enthusiasts. You can find skeins of yarn, embroidery floss, or macramé cord, as well as fabric remnants from old t-shirts or sheets. Keep an eye out for wooden dowels, embroidery hoops, or even small branches to use as the base for your project.
Prices are budget-friendly, with yarn usually costing $1–3 per skein, fabric scraps between $0.50–2, and wooden dowels or hoops ranging from $1–5. You can easily create a beautiful wall hanging for under $15.
Material Selection Tips: Choose yarns with interesting textures, like chunky wool or metallic threads, for a more dynamic look. Natural fibers, like cotton or wool, tend to drape better and are easier to work with. Steer clear of synthetic yarns that feel stiff or scratchy, as they can be less forgiving when crafting.
Essential Supplies:
- A wooden dowel, embroidery hoop, or sturdy branch (12–18 inches wide)
- A variety of yarns and fibers in coordinating colors
- Sharp fabric scissors
- Measuring tape
- A comb for separating fibers
Once you’ve gathered your materials, you’re ready to bring your vision to life.
Crafting Your Wall Hanging: Start by cutting yarn into varying lengths – some around 12 inches, others between 18–24 inches – to create a layered effect. Fold each piece in half and attach it to your base with a simple lark’s head knot.
Design Techniques: Play with texture by alternating thick and thin yarns. Group similar colors together for a cohesive look, and add braids or twists to give your piece more dimension.
Finishing Touches: Use a comb to gently separate fibers at the bottom for a soft, feathered effect. Trim the ends at different angles to achieve a natural, organic look.
Display Ideas: Hang your finished piece on a nail or hook, allowing it to sway slightly with the air currents. These wall hangings look especially charming in bedrooms, cozy reading nooks, or above sofas, where their soft textures add a relaxed vibe.
What makes these wall hangings so special is their individuality. Every thrifted yarn or fabric piece contributes its own character, ensuring your creation is one-of-a-kind.
5. Upcycled Framed Wallpaper Art
Turn leftover wallpaper samples and old books into stylish, budget-conscious wall decor.
Discover Hidden Gems at City Thrift: Browse City Thrift for vintage wallpaper sample books from the 1960s–1980s or loose rolls saved from renovations. These finds are perfect for creating one-of-a-kind wall art.
Choosing the Perfect Patterns: Look for wallpaper designs that stand the test of time. Patterns like damask, botanical prints, or mid-century geometric styles are great choices. Avoid overly busy designs that might clash with your space. Metallic details or subtle textures can add a touch of elegance. Once you’ve found your ideal pattern, gather the supplies you’ll need.
What You’ll Need:
- Wallpaper samples or sections (at least 8×10 inches)
- Picture frames in complementary colors
- A sharp craft knife or scissors
- A ruler or straight edge
- Double-sided tape or spray adhesive
Assembling Your Art: Cut the wallpaper to fit your frames, leaving about 1/4 inch extra on all sides. This allows you to wrap the edges neatly around the frame backing. For a cohesive look, choose frames in matching or coordinating colors.
Design Tips: When arranging your framed wallpaper, aim for visual interest by grouping three to five pieces. Combine patterns of different scales, like a bold floral with a smaller geometric print. For a contemporary vibe, consider cutting the wallpaper into shapes like hexagons or circles instead of sticking to standard rectangles.
Finishing Touches: Start mounting the wallpaper from the center outward to avoid bubbles, and press out any curls by placing the pieces under heavy books overnight.
Displaying Your Artwork: Arrange your framed pieces in a grid for a polished gallery wall look, or stagger them for a more casual, organic feel. These displays work beautifully in areas like powder rooms, hallways, or over a console table.
Framed wallpaper art is a creative way to bring color and pattern into your home without the permanence of wallpapering an entire room. Each piece adds personality and becomes a unique conversation starter, all while staying easy on your wallet.
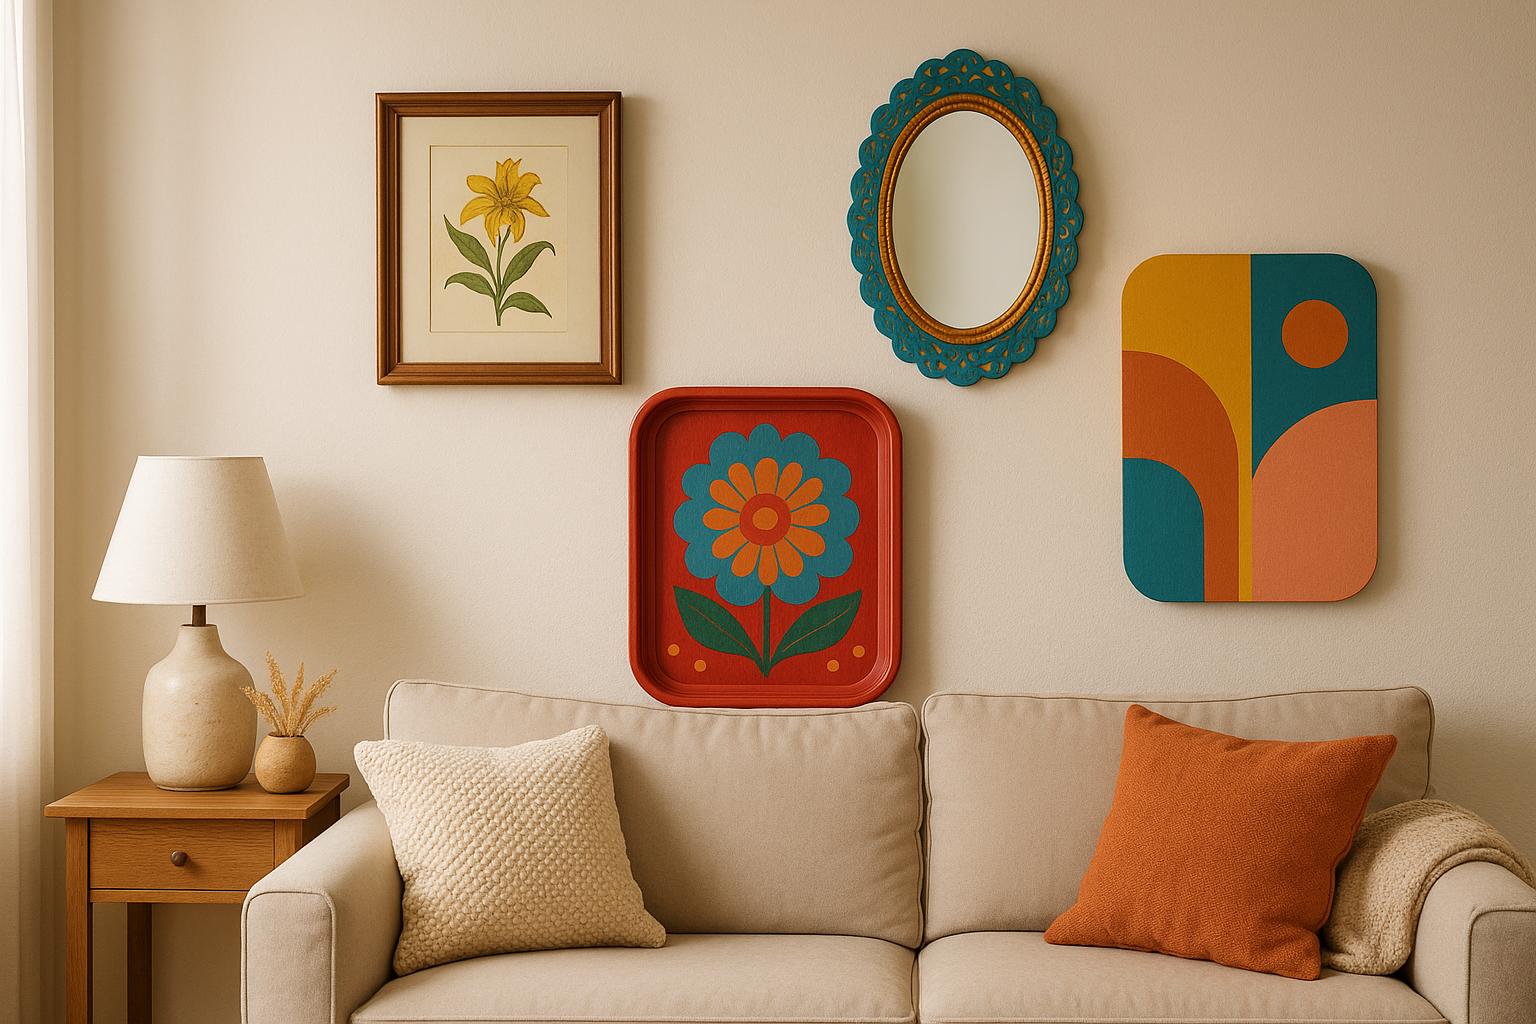
6. Vintage Frame Gallery Wall
Turn mismatched vintage frames into a stunning centerpiece for your space. The key to pulling off this project lies in smart sourcing and thoughtful planning, transforming thrift store finds into a cohesive and stylish gallery wall.
Hunting for Frames at City Thrift: Head over to City Thrift to browse their selection of vintage frames in a variety of sizes, styles, and finishes. Keep an eye out for frames that span different decades – like ornate gold designs from the 1970s, minimalist wooden frames from the 1980s, or sleek metal options from the 1990s. When tied together with a unifying element, these eclectic finds create a harmonious display.
Creating a Unified Look: To make your gallery wall feel intentional, choose a common thread to tie the frames together. This could be a consistent color palette (such as gold and brass tones or neutral whites and creams), a shared era (like mid-century modern), or a repeated material (such as wood in varied stains). Even the most diverse mix of frames will look polished when united by one of these elements.
What You’ll Need:
- 5–9 vintage frames in assorted sizes
- Spray paint or wood stain (if refinishing is needed)
- Fine-grit sandpaper
- Artwork, photos, or prints for the frames
- Picture hanging hardware
- Level and measuring tape
- Brown paper (for templates)
Mapping Out Your Layout: Before you start hanging, trace each frame onto brown paper and cut out the shapes. Use painter’s tape to attach the paper templates to your wall, experimenting with different layouts. Start with the largest frame as your anchor piece and arrange the others around it, keeping 2–3 inches of space between frames for a balanced, uncluttered look.
Refreshing Your Frames: If your wooden frames are scratched or worn, lightly sand them and apply a fresh coat of stain or paint. For metal frames, a simple cleaning with soap and water often reveals their original charm.
Filling the Frames: Add variety by filling your frames with a mix of content – family photos, vintage artwork, or even decorative paper. This mix prevents the display from feeling too uniform while still keeping a cohesive style through the frames.
Hanging Tips: Start hanging frames from the center and work outward. Position the anchor frame so its center is 57–60 inches from the floor – this height works well for most spaces. Use a level to ensure everything hangs straight.
Incorporating the Wall Color: Don’t overlook the wall color as part of your design. Dark walls create a dramatic backdrop for gold and brass frames, while light walls let colorful artwork take the spotlight. For extra depth, consider leaning one or two frames against the wall on a console table or shelf below the main arrangement.
This project transforms thrifted frames into a timeless and personal statement piece. Next, we’ll dive into another creative way to upcycle everyday items into striking wall art.
7. Repurposed Mirror Mosaic
Turn broken mirrors from thrift stores into stunning mosaic wall art, transforming discarded pieces into a reflective masterpiece for your home. This project is perfect for those ready to dive into an intermediate-level DIY challenge.
Where to Find Mirrors: Check out thrift stores like City Thrift for mirrors with unique shapes or ornate frames. Don’t worry about cracks or chips – those imperfections are ideal for mosaics. Vintage vanity mirrors, decorative wall mirrors, and mirrored tiles from old furniture are all excellent options.
Safety First: Before breaking any mirrors, prioritize safety. Equip yourself with heavy gloves, safety goggles, and a protective apron to prevent injuries from sharp edges or flying glass shards. Choose a cleanable, isolated area for this step, keeping it free from pets or people.
What You’ll Need:
- 1–3 thrift store mirrors
- Thick cloth, old pillowcase, or heavy-duty paper bag
- Wooden backing board or canvas
- Mirror adhesive or strong craft glue
- Grout (optional)
- Grout float and sponge
- Hammer or rubber mallet
Breaking Mirrors Safely: Wrap the mirror securely in a thick cloth, pillowcase, or sturdy material to control glass shards and simplify cleanup. For irregular shapes, cover both sides with fabric. Place the wrapped mirror on a hard surface and gently tap the center with a hammer, working outward. This method minimizes glass dust and creates larger, usable pieces. Once broken, sort the pieces for easy access during the design phase.
Plan Your Design: Lay out your mirror pieces on the backing board before gluing them down. Experiment with geometric patterns, sunburst designs, or flowing organic shapes. If you’re using grout, leave small gaps between pieces. For a seamless look, arrange the pieces closer together.
Assembling the Mosaic: Begin gluing your mirror pieces at the center of your design and work outward. Press each piece firmly for 10–15 seconds to ensure a strong bond. Allow the adhesive to cure for 24 hours before applying grout. If using grout, spread it across the surface and wipe away excess with a damp sponge, working diagonally to avoid pulling grout from the joints.
Polishing and Finishing: Once the mosaic is dry, clean the mirror surfaces with glass cleaner to remove adhesive residue or grout haze. Add a frame using wood trim for a polished look, or leave it frameless for a modern aesthetic.
Best Places to Display: Hang your mirror mosaic where it can catch natural or artificial light to amplify its reflective charm. Hallways, entryways, and dining rooms are great options, as the fractured reflections create captivating patterns on nearby walls.
Cleaning Up: After finishing your project, carefully sweep up all glass fragments and dispose of them in a puncture-resistant container. Double-check the area for stray shards, as they can travel farther than expected during the breaking process.
With these steps, you can craft a dazzling mosaic that breathes new life into broken mirrors while adding a dynamic touch to your home.
8. Basket Wall Art
Turn thrift store baskets into stunning wall displays that bring warmth and texture to your space. This simple yet striking project is perfect for beginners, requiring just a few tools and showcasing the beauty of natural materials.
Finding the Perfect Baskets
Thrift stores like City Thrift are treasure troves for woven baskets that can become the centerpiece of your wall art. Look for unique woven trays to create an affordable collection. Julie from Redhead Can Decorate offers this advice:
“When shopping for baskets, look for unique patterns, big handles, and no broken edges.”
What to Look For
Seek out baskets with eye-catching patterns, interesting textures, and sturdy handles that double as hanging points. Avoid pieces with broken edges, and mix sizes and designs for a layered, dynamic look. Building your collection might take a few trips, so be patient and keep an open mind.
Preparation Steps
Before mounting, clean each basket with disinfectant wipes to remove dust. Lay them out on the floor first to experiment with different arrangements. This step helps you visualize the final layout and ensures a balanced design before committing to wall placement.
Mounting Methods
For easy hanging, use small Command Hooks. Press them firmly onto a clean, dry wall for about 30 seconds. Many baskets already have loops for hanging, but if not, you can create your own. Use waxed thread and a sturdy needle to sew a loop through the weave. Decorative push pins are another great option for flat baskets – just pin them at the center. This method is especially renter-friendly and avoids wall damage.
Design Tips
To achieve a polished look, keep the spacing between baskets consistent and mix large and small pieces for balance. Start by hanging the largest basket in the center, then arrange smaller ones around it. The varied textures will play with light throughout the day, adding depth and interest to your display.
Customization Options
Want your baskets to match your decor? Add a personal touch by painting or staining them. Use a damp brush to apply a thin coat of diluted craft paint, then blot off any excess. This technique adds subtle color while preserving the natural texture of the baskets.
9. Painted Wooden Object Art
Thrifted wooden items like cutting boards, serving trays, or plaques can be transformed into beautiful DIY wall art. These pieces make for an affordable way to create unique decor while giving a second life to discarded wooden objects.
Choosing the Right Wooden Pieces
When searching for wooden items, focus on those with smooth, flat surfaces – they’re the easiest to work with. Cutting boards are a top pick since they’re durable and often have a great shape for display. While light wear can add charm to your finished piece, avoid items with deep scratches or damage that could disrupt your design.
Getting the Surface Ready
Start by thoroughly cleaning your wooden piece with a damp cloth to remove dirt or grease. If the surface feels rough, sand it down lightly using 220-grit sandpaper to ensure a smooth base for painting. Once you’ve sanded, wipe off any dust with a dry cloth. For an even better result, consider applying a primer to help the paint adhere evenly.
Paint and Techniques
Acrylic paints are your best bet – they dry quickly and provide solid coverage on wood. You can use stencils for precision or go freehand for a more personal touch. For abstract designs, try dabbing paint with a sponge for texture or use an ombre technique to blend colors from light to dark. These methods allow you to create everything from bold statements to subtle accents.
Creative Design Ideas
Geometric patterns and botanical motifs are timeless choices and work well with both modern and classic decor. For cutting boards, consider painting inspirational quotes, family names, or even a favorite recipe. Match your paint colors to your room’s palette to ensure your artwork fits seamlessly into your space.
Finishing and Protecting
Once your design is dry, apply a clear acrylic sealant to protect the paint. This step is especially important for pieces displayed in kitchens or bathrooms where humidity can be an issue. The sealant not only protects but also adds a polished, professional touch to your creation.
Displaying Your Artwork
When it’s time to hang your masterpiece, use picture strips, sawtooth hangers, or wall anchors, depending on the weight and size of your piece. With just a little effort, your thrifted wooden find can become a personalized and eye-catching addition to your home.
10. Framed Botanical or Nature Prints
Botanical prints are a wonderful way to bring the outdoors inside, adding a touch of natural beauty to your walls. They work well with almost any decor style, offering a timeless elegance. By pairing pressed flowers, leaves, or botanical art with secondhand frames, you can create a charming and eco-friendly piece of decor.
Hunting for Thrifted Frames
When searching for frames, don’t worry about the existing artwork or finish – they can be easily replaced or updated. Focus on the size and style of the frame itself. Whether you prefer something simple, ornate, wooden, or even made from composite materials, thrift stores are a treasure trove for unique finds. If you’re in or near Kansas City, check out local nonprofit thrift shops like City Thrift for one-of-a-kind frames that are perfect for a creative refresh.
Getting Your Frames Ready
Once you’ve chosen your frame, it’s time to prepare it for its new life. Start by removing the paper backing, artwork, and mat from the frame. Carefully take out any staples holding things in place. If the staples are still in good condition, save them – you can reuse them when reassembling your project.
Personalizing Your Frame
To give your frame a fresh look, try this simple painting technique:
- Start with a beige acrylic base coat, applying it evenly with a foam brush.
- Add a watered-down layer of gold paint for a subtle shimmer.
- Finish with a light cream coat, brushing it off gently to create a distressed, textured effect.
For extra character, apply a mix of dark and clear wax with a soft cloth, wiping off the excess to accentuate the frame’s details.
Designing Your Botanical Art
Now comes the fun part – arranging your botanical elements! Whether you’re using pressed flowers, leaves, or printed botanical art, take the time to create a layout that complements your room’s colors and design style. This approach pairs beautifully with traditional, farmhouse, or grand millennial aesthetics, adding warmth and charm.
Putting It All Together
Once the paint is dry and your botanical arrangement is finalized, it’s time to reassemble the frame. If the original staple holes are loose, reinforce them with duct tape. Alternatively, you can cover the back with brown craft paper, securing it with hot glue for a polished finish.
The result? A stunning piece of artwork that not only brings a touch of nature into your home but also reflects your creativity and dedication to sustainable decorating.
Tips for Customizing and Displaying Your DIY Wall Art
The way you display your DIY wall art can turn it into the centerpiece of your room. A thoughtful approach to textures, colors, and materials ensures your art doesn’t just blend in but enhances your overall decor.
Start with a Neutral Foundation
Begin with a neutral backdrop for your walls and main furniture pieces. Shades like cream, beige, or soft gray work well to let your art take center stage without competing for attention.
Play with Texture for Visual Interest
After setting up your base, focus on layering textures to create a dynamic look. DIY wall art often brings unique textures to a space, so use this to your advantage. Pair soft fabrics with rougher materials for a balanced effect. For instance, combine cozy textiles with natural wood accents to create a seamless mix of textures that feels intentional and inviting.
Conclusion
Turning thrift store finds into DIY wall art brings together creativity, affordability, and the chance to make a meaningful impact. It’s a way to infuse your personal style into your home while giving new life to items that carry their own unique history. The result? A living space that feels truly one-of-a-kind – something you can’t achieve with store-bought art.
But the benefits go beyond just decorating your home. Shopping at City Thrift in Kansas City and nearby areas does more than provide materials for your next project. Every purchase directly supports City Union Mission’s work, helping provide meals, shelter, and essential services to those in need. Plus, with new inventory arriving regularly, you’ll always find fresh inspiration. Affordable prices and frequent sales make it easy to experiment with different materials and techniques without stretching your budget.
Every DIY project is an opportunity to express yourself and make a difference. If you’re ready to dive into your next creative venture, stop by City Thrift to explore their ever-changing selection of second-hand treasures. You can also contribute by donating items you no longer need or volunteering your time. Let your imagination transform both your space and your community.
FAQs
How do I choose good-quality thrifted items for my DIY wall art projects?
When hunting for thrifted treasures to use in your DIY wall art, take a close look at each item. Focus on solid materials like wood, metal, or natural fabrics such as cotton, wool, or silk – these tend to hold up well and are easier to work with. Be sure to check for issues like tears, stains, or cracks, and confirm that frames or decorative pieces are still in good shape structurally.
Keep an open mind about the item’s potential. Sometimes, all it takes is a good cleaning, a fresh coat of paint, or a little creativity to turn a thrift store find into a standout piece for your wall. Take a moment to imagine how the item could fit into your project before committing to buy it.
How can I customize thrift store finds to fit my home decor?
Customizing thrift store finds is an exciting and budget-friendly way to bring character to your home. A simple coat of paint or spray paint can transform an item to match your color palette or create a striking accent piece. You can also get inventive by repurposing items – like turning old picture frames into chalkboards or mirrors – or combining different pieces to craft something entirely new. Adding these personal touches not only makes the item seamlessly fit your decor but also ensures it’s truly one-of-a-kind.
For affordable materials, check out City Thrift, where you’ll find a wide variety of second-hand treasures perfect for DIY projects. Plus, every purchase supports homelessness and poverty relief efforts in your community.
How does shopping at City Thrift benefit the community and encourage sustainability?
Shopping at City Thrift does more than just provide great finds – it actively supports the community. When you shop here, you’re directly contributing to local charities, creating jobs, and nurturing a spirit of generosity. For example, proceeds help fund programs like City Union Mission, which offers critical support to individuals facing homelessness and poverty.
City Thrift also champions eco-conscious living. By giving second-hand items a new life, the store helps cut down on waste and keeps perfectly usable goods out of landfills. Whether you’re shopping or donating, your actions make a positive impact – not just for the environment, but for the people in your community too.